Continuous Control (Snake)
Snake Game
Continuous control is the type of myoelectric control used by amputees to control a prosthesis. In these control schemes, decisions are generated \(N\) times per second and used to micro-adjust a device. This example leverages this type of control for a common HCI application - gaming.
We created an adapted version of the traditional snake game to explore a simple continuous control scheme. This game was implemented using pygame, a simple python game engine. The idea of the game is that the player will collect “food” to grow the snake as big as possible. Each prediction (occurring at \(N\) times per second) moves the snake one unit in that direction.
Myo

Delsys
________
Game Design
This section focuses on the design considerations for interfacing the game with EMG-based input. To explore the game design code, please review snake_game.py.
Most game engines (including pygame) update the graphical user interface (GUI) based on a looping system. By setting self.clock.tick(30) the screen refresh rate is capped at 30 Hz. As a result, the GUI will update 30 times every second. Interestingly, this has significant consequences for our continuous EMG-based control system. Note that the handle_movement function is called in this loop - meaning it is called 30 times a second.
# Game loop
def run_game(self):
    while self.running:
        # Listen for movement events
        self.handle_movement()

        # Additional game related code... (see snake_game.py)

        pygame.display.update()
        # Refresh rate is 30 Hz
        self.clock.tick(30)

    pygame.quit()
The first step involved creating a version where the arrow keys moved the snake. Note that we are appending the movement direction to an array to keep track of the previous movement of all parts of the snake. The move_snake function moves each part of the snake in the specified direction.
def handle_movement(self):
    for event in pygame.event.get():
        if event.type == pygame.QUIT:
            self.running = False

        # Listen for key presses:
        if event.type == pygame.KEYDOWN:
            if event.key == pygame.K_LEFT:
                self.previous_key_presses.append("left")
            elif event.key == pygame.K_RIGHT:
                self.previous_key_presses.append("right")
            elif event.key == pygame.K_UP:
                self.previous_key_presses.append("up")
            elif event.key == pygame.K_DOWN:
                self.previous_key_presses.append("down")
            else:
                return

            self.move_snake()
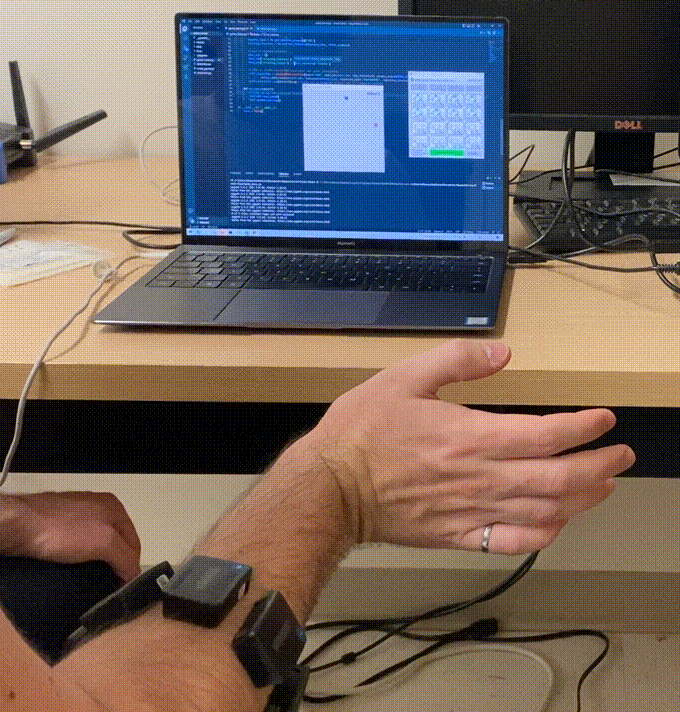
Converting the keyboard version to leverage EMG-based control required a simple modification. As LibEMG streams all classification decisions over UDP, we set up a socket listening on the specified port and IP. By default, the OnlineEMGClassifier streams at port:12346 and ip:'127.0.0.1'.
# Socket for reading EMG
self.sock = socket.socket(socket.AF_INET, socket.SOCK_DGRAM)
self.sock.bind(('127.0.0.1', 12346))
After setting up the socket, moving the snake is almost identical to using key presses. Instead of looking for a specific key press, the predicted class label is mapped to a direction. For example, the mappings from predictions to controls are 0 (Hand Close)-down, 1 (Hand Open)-up, 3 (Wrist Extension)-right, and 4 (Wrist Flexion)-left. Note that the snake only moves when a prediction is made by the EMG Classifier.
def handle_emg(self):
    data, _ = self.sock.recvfrom(1024)
    data = str(data.decode("utf-8"))
    if data:
        input_class = float(data.split(' ')[0])
        # 0 = Hand Closed = down
        if input_class == 0:
            self.previous_key_presses.append("down")
        # 1 = Hand Open
        elif input_class == 1:
            self.previous_key_presses.append("up")
        # 3 = Extension
        elif input_class == 3:
            self.previous_key_presses.append("right")
        # 4 = Flexion
        elif input_class == 4:
            self.previous_key_presses.append("left")
        else:
            return

        self.move_snake()
Classification and Model Training
Now that we have shown how to leverage EMG predictions to replace traditional key presses for snake control, we need to explore the design of the continuous control system. The first step in any EMG-based control scheme is accumulating training data to train the machine learning model. The accumulation of screen-guided training data is built directly into the game using the Screen Guided Training tool. All code can be found in game_menu.py.

First, the required imports from libemg:
from libemg.gui import GUI
from libemg.data_handler import OnlineDataHandler, OfflineDataHandler, RegexFilter
from libemg.streamers import oymotion_streamer
from libemg.feature_extractor import FeatureExtractor
from libemg.emg_predictor import OnlineEMGClassifier, EMGClassifier
To listen for decisions streamed over a port, an OnlineDataHandler is required. This data handler maintains a real-time EMG data buffer and is required for training and classification.
streamer, sm = oymotion_streamer()
self.odh = OnlineDataHandler(sm)
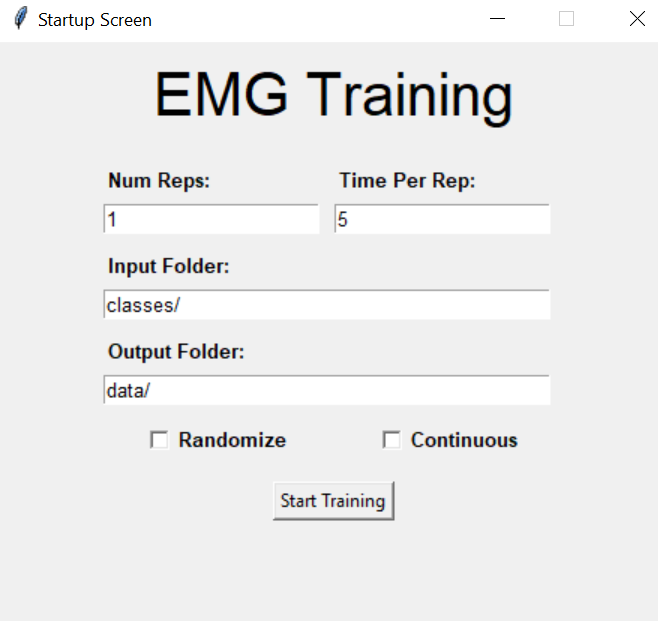
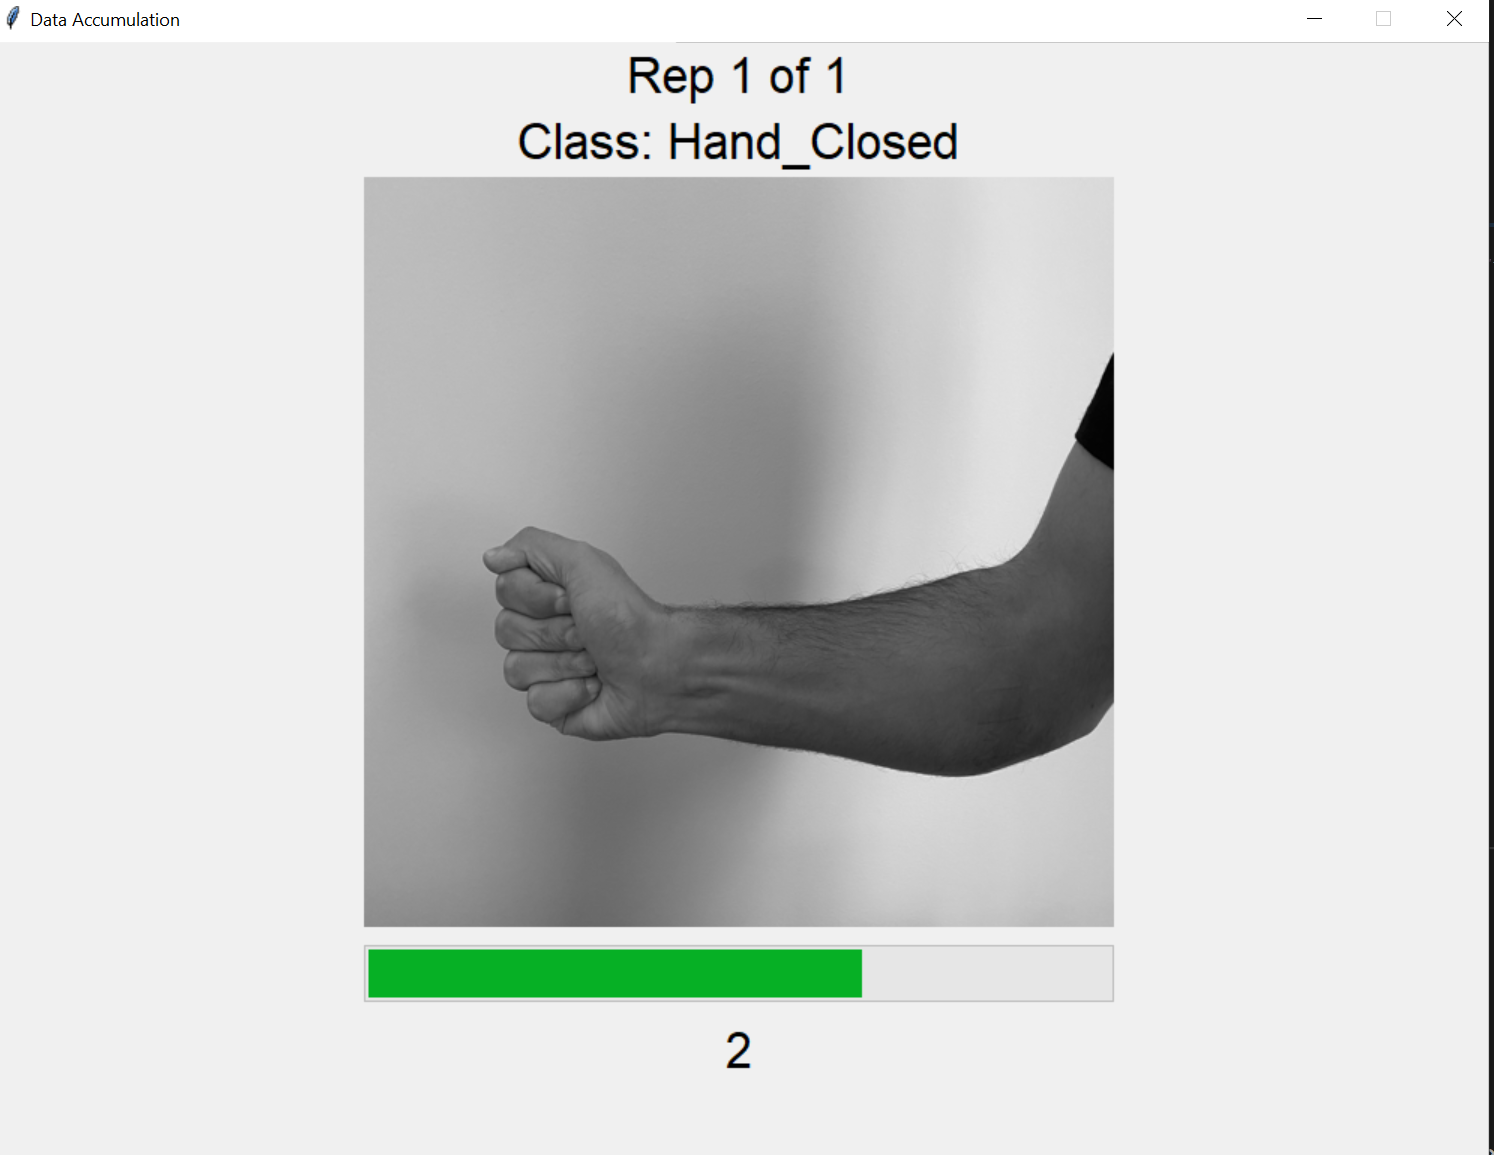
When the data accumulation button is pressed the training UI menu is presented to the user. Note that using the LibEMGGesture library, automatically downloads the images for each class if they do not already exist. After finishing the data accumulation, the simple game menu is re-initialized.
def launch_training(self):
    self.window.destroy()
    # Launch training ui
    training_ui = GUI(self.odh, width=700, height=700, gesture_height=300, gesture_width=300)
    training_ui.download_gestures([1,2,3,4,5], "images/")
    training_ui.start_gui()
    self.initialize_ui()
The game starts when the play button is clicked. However, the first thing to do is spin up an OnlineEMGClassifier to make predictions in a separate process that the game can use.
def play_snake(self):
    self.window.destroy()
    self.set_up_classifier()
    SnakeGame().run_game()
    # Its important to stop the classifier after the game has ended
    # Otherwise it will continuously run in a seperate process
    self.classifier.stop_running()
    self.initialize_ui()
After acquiring the offline training data, creating an online classifier is simple. Step 1 involves parsing the accumulated training data for a particular user. This training data can then be split into train_windows and train_metadata. The rep values will depend on the number of training reps acquired for each class.
# Step 1: Parse offline training data
dataset_folder = 'data/'
regex_filters = [
    RegexFilter(left_bound = "C_", right_bound="_R", values = ["0","1","2","3","4"], description='classes'),
    RegexFilter(left_bound = "R_", right_bound="_emg.csv", values = ["0", "1", "2"], description='reps'),
]

offline_dh = OfflineDataHandler()
offline_dh.get_data(folder_location=dataset_folder, regex_filters=regex_filters, delimiter=",")
train_windows, train_metadata = offline_dh.parse_windows(WINDOW_SIZE, WINDOW_INCREMENT)
Step 2 involves extracting features from the train_windows since the online classifier expects these as input. In this example, Hudgins’ Time Domain (HTD) features are extracted, a common grouping used for prosthesis control. However, testing different features or feature groups could be done by changing this line.
# Step 2: Extract features from offline data
fe = FeatureExtractor()
feature_list = fe.get_feature_groups()['HTD']
training_features = fe.extract_features(feature_list, train_windows)
Step 3 involves setting up the dataset dictionary that is passed into the classifier.
# Step 3: Dataset creation
data_set = {}
data_set['training_features'] = training_features
data_set['training_labels'] = train_metadata['classes']
Step 4 involves setting up the EMGClassifier for the OnlineClassifier. An LDA model was chosen since it is known to work well and is reliable. Note that other models could be used here if desired.
# Step 4: Create the EMG Classifier
o_classifier = EMGClassifier("LDA")
o_classifier.fit(feature_dictionary=data_set)
Finally, in step 5 an online EMG classifier is trained and begins streaming predictions. By default these predictions are streamed at port:12346 and ip:'127.0.0.1'.
# Step 5: Create online EMG classifier and start classifying.
self.classifier = OnlineEMGClassifier(o_classifier, WINDOW_SIZE, WINDOW_INCREMENT, self.odh, feature_list)
self.classifier.run(block=False) # block set to false so it will run in a seperate process.
Notice that the online classifier has a window size and window increment option. Since the refresh rate of the game is 30 Hz, the minimum increment in time would be \(\frac{1000\text{ms}}{30hz}=33 \text{ms}\). Anything less would result in decisions that would not be leveraged by the game. Selecting these values is not trivial and often takes experimentation. While smaller increments result in more responsive systems, this may not be desired. A larger window size may result in more accurate predictions but introduces lag into the system. In this example, we select a window size of 0.5s (100 samples for the Myo) and an increment of 0.25s (50 samples for the Myo). Since we move the snake 20 pixels for every input, the snake moves 80 pixels in a given second (assuming no decisions are rejected).
WINDOW_SIZE = 100
WINDOW_INCREMENT = 50